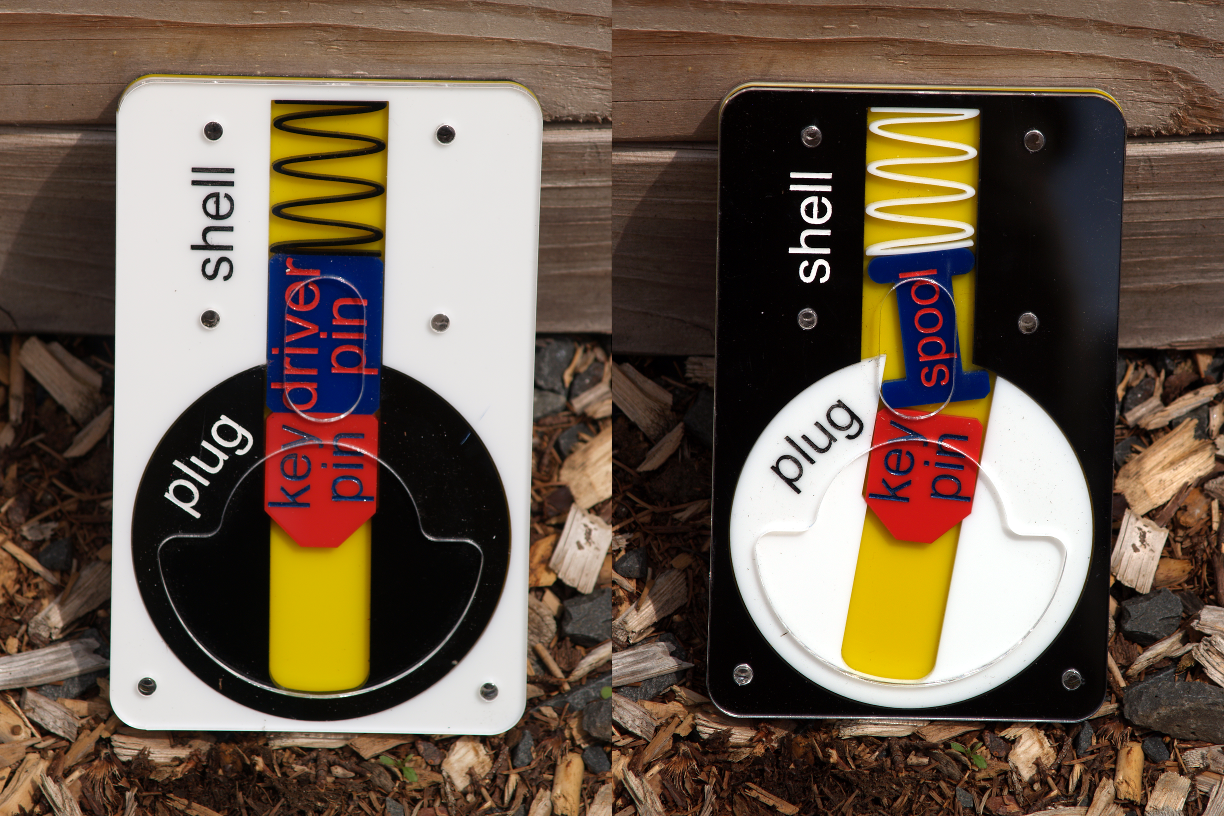
Understanding locks the easy way
Laser cut acrylic, vinyl, model paint plus a whole lot of time are the raw ingredients for one of these excellent, double-sided teaching tools. If you teach lockpicking on a regular basis as part of your job or just a hobby, you can already see how useful this interactive diagram is. No more wild hand gestures or painting in the sky while trying to describe the difference between a standard driver pin and a spool pin. No more pushing salt and pepper shakers around next to a carefully positioned silverware “sheer-line” which only makes sense if you already know how locks work. Put this in a student’s hands and they will quickly understand what is going on inside of a pin-tumbler lock.
This video by bosnianbill includes a little demo of an ancient revision:
It isn’t easy to verbally describe how a lock works. I’ve been doing this regularly for many years and wishing I had a thing to make the process simpler. Something that would clearly and intuitively show how all of the significant parts of a pin-tumbler lock interact. I wanted it to be small enough to carry around, big enough for people to see across a table and not weigh a ton. It seemed like such a thing must exist somewhere. I thought I just wasn’t looking hard enough. In early 2014, I gave up looking and started designing. Two and a half years later, I finally have a prototype I mostly like.
This design allows for tool-free replacement of the pin-stack in case you want to swap out for serrated pins, or upgrade the spring. Multiple drop tests on cement and thin carpet have resulted in only minor cosmetic damage. Prototypes are hand made and very time consuming, but I’m willing to make them for you. Lots of machine time goes into raster engraving the labels. Even more time goes into hand painting the engraved areas.
- $40 - Barebones: no raster labels
- $60 - Simple: raster labels without paint
- $80 - Standard: high contrast labels
Each piece is made to order. So get in touch and I’ll add you to the build queue. See the about page for contact info.
UPDATE If you have access to a laser cutter, vinyl cutter, arbor press and a bunch of time, try making one yourself! Grab the SVG design file and head to your local hackerspace. The tough part is allowing internal layers enough space to move freely. Either moving parts need to be slightly thinner material, or a spacer like 30mil calendared vinyl can be used to stack up the non-moving parts. Laser X/Y stepping on the round cuts will directly impact the ability for the plug to rotate by creating little teeth that grab the neighboring part. Some laser carriages just aren’t up to the task but slower speeds with lower power may help. Polishing and lubrication also help. The laser cut springs are super finicky. Rough edges create stress concentrators and are more likely to break. Painting is tedious but results in more durable moving parts than softer materials like Gravoply. Tweaking hole diameters based on your laser kerf is required in order to get a good friction fit on acrylic rod. If you get one working, I’d love to see your result! Email me or mention on Twitter!